Marcipánové torty 2 - fotopostupy, recepty
Všechny možné foto-postupy, recepty na krémy a dorty sem... 😉
@dadika1114 tu je recept overeny...,
http://www.lorna.estranky.sk/clanky/marcipan-a-...
ja nezarabam kupujem v cukrarskych potrebach hotovu hmotu ak si zaciatocnicka odporucam prave kupit napr. Smartflex velvet..., dobre sa farbi a lahko sa s nim pracuje, a aj chutovo je celkom fajn, maju rozne prichute napr. mandla, vanilka, pomaranc, jahoda, aj ine...u nas najviac ide mandla a vanilka
MMF nezafarbis lahko na syte farby a moze sa ti stat, ze sa ti hmota bude drobit
od @ mysiatkoo
video na marbling (mramorovanie)
abeceda od @pipka (ak by sa niekto pytal 😀)
dievčatá prosím vás poraďte mi , ako mám urobiť hokejistu alebo ak máte fotopostup , prosím podeľte sa so mnou oň. Ďakujem. 🙂
link na objednavku abecedy od @mysiatkoo
baby tu abecedu som objednavala priamo zo stranky...baby tu pisali, ze na nu cakali dlhoooo a napriamo to je do tyzdna doma ;)
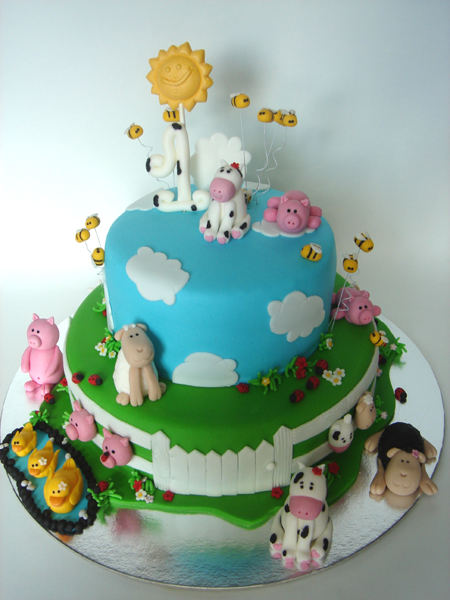
Ahojte šikulky, poradíte mi, kde by som zohnala takéto odtiene marcipánu ako na obrázku? Hľadám na nete, ale podľa obrázkov v eshope si neviem vybrať. Ja len tak, či náááhodou nemáte skúsenosť s niektorými, že by to boli presne takéto odtiene. sama si také samozrejme neviem namiešať.. ďakujem vopred za každú radu.. 🙂 A ešte mám otázku, je tu aj mamička z TN alebo okolia, že by mi urobila figúrky na tortu zvieratká z farmy, podobné ako na foto?
@miskam1 ahojky, sup sem 🙂
https://www.modrykonik.cz/diskuse/spolocne-nazo...
Do rad, sem sa len ukladaju fotopostupy, tu sa nediskutuje.
Postup na "detske tenisky" so sablonou
Od @mamcas a od @zaciatocnickalubka
inspiracie na krive vesele torty
od @dada2007 instrukcie na jednotlive koncovky kostic
@luciahromadkova mozno by nebolo odveci inspiracie vkladat sem > 🙂
video s postupom ako na krivu poschodovu tortu
https://www.youtube.com/watch?v=xHY_F53ClJ8Nemohli by ste sem dávať rovno obrázkové postupy? Lebo linky, čo sem vkladáte, nemusia ísť po čase otvoriť ( napr. už pár strán dozadu nejdu niektoré otvoriť). Obrázok ostane stále. nehovoriac o tom že je to krajšie a prehladnejšie.Vďaka.
@jachin ja osobne urcite nemozem, lebo stiahnut obrazky na cely postup trva niekedy dlhsie a vkladat to sem po jednom tiez nie je vzdy cas. Co sa tyka linkov niektore stranky napr. lovelytutorials.com maju planovanu udrzbu a odstavku a vtedy to jednoducho nejde, treba sa na pripravit a ak potrebujes obrazky stiahnut vopred do svojho PC.
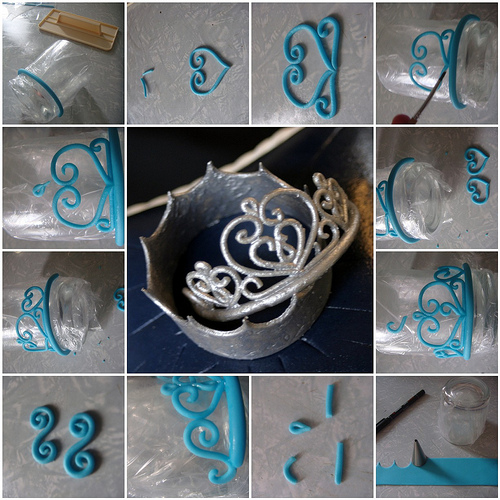
jednoduchy navod na korunku pre princezny
inšpiracie ku korunkam:
https://www.modrykonik.cz/diskuse/spolecne-nazo...
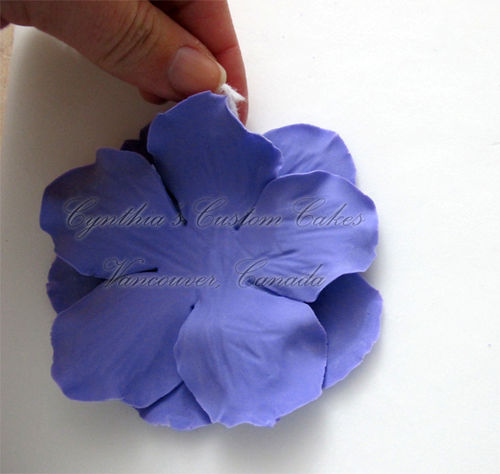
postup na "zelatinovy kvietok"
http://www.blog.birdsparty.com/2012/02/cake-it-...
Cake it Pretty: Gelatin Flower Cupcake Topper
I think this original edible decoration from Belle Cake Topper and Mould would make a great alternative to sugar paste fondant, and would look so whimsical on top of a cake or cupcake, don't you think? 🙂
What you'll need:
* flower wire (number 33)
* gelatine powder ( 1 part of gelatine : 2 parts of water)
* water
* food coloring
* petal mould
* fondant
How to make your gelatin flower toppers:
1. prepare the wire
2. with pliers make the petal shape
3. make 4 petals
4. prepare the gelatine ( 1 part of gelatine : 2 part of water)
5. boil the gelatin until well mixed
6. put the wire petals on the mould and pour the gelatin mix onto the mould
7. leave it until the petals set
8. model the fondant ball into a tear drop shape, and stick to the wire.
9. assemble the flower petals and display onto a cupcake or cake.

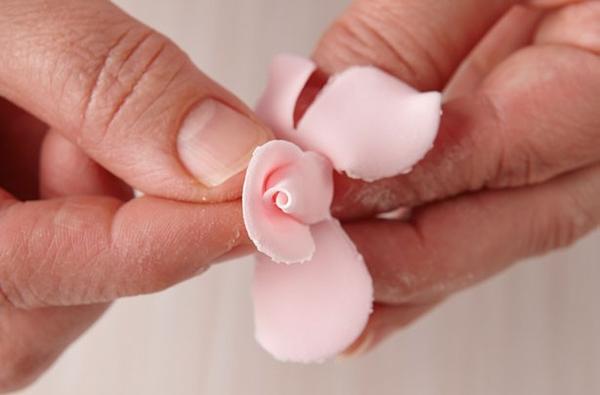
fotopostup ruza
http://www.goodtoknow.co.uk/recipes/537960/how-...
These simple and impressive roses are easy to make when you know how. With our easy step-by-step recipe, you'll have these pretty treats perfected in no time. From wedding cakes to birthday cupcakes, these delicate, edible roses are the ideal topper to turn a standard cake into a work of art. Try different colours of sugarpaste like pastel blue or yellow for different seasons. Bright red roses would be a luxurious topper for Valentine's Day or pastel yellow blooms for Mother's Day. This technique has been tripled tested in the Woman's Weekly kitchen and is the simplest, most effective way to make these beautiful, delicate cake toppers.
Equipment
Cocktail sticks Water brush or paintbrush Small square of muslin cloth and a ribbon or string Smooth non-stick board for flower making 5 petal blossom cutter/s, eg, PME 45mm and/or 57mm cutters Flower drying stand or non-drying modelling clay Pressure pad Dog-bone modelling tool
Ingredients
1 x 200g packet white flower paste, e.g. Squires Kitchen Florist Paste Pale pink, pale yellow and soft peach flower paste, e.g. Squires Kitchen Florist Paste (Pastel)
Step 1
Spoon a small amount of cornflour into the centre of the muslin square and gather up the sides and tie it with ribbon or string, and use this to tap on the work surface to dust.
Step 2
To make cones for the centre of the roses, work some white flower paste to soften it, roll it into a ball and then roll one side to a point to give a cone shape. The cone, when held in the centre of the cutter should come about halfway up the height of the petal.
Step 3
Stick a cocktail stick into the broad end of the cone and place in a stand to dry, or stick the cocktail stick into a flower drying stand or a clump of non-drying modelling clay (or even a ball of leftover sugarpaste or marzipan).
Step 4
Use the ready-coloured pink flower paste mixed with white to give three different shades of pink, keeping them wrapped in a freezer bag so they don’t dry out. Starting with the darkest shade, roll the paste out very thinly on the non-stick board dusted lightly with cornflour and use the cutter to cut out petals.
Step 5
Place the petals on a pressure pad and dab lightly with cornflour, then rub over the edge with the dog-bone modelling tool. Hold the tool so it’s half on and half off the petal, so the petal flutes gently, rather than just cupping up.
Step 6
Flip the petals over and pull a cocktail stick with a cone on it through the centre until the cone rests on the petals. Brush water over about half of one of the petals. Be careful not to use too much water, though, as it will make it slippery.
Step 7
Lift the dampened petal up and wrap it tightly around the cone, so that when you look down from the top you can’t see any of the white of the cone showing in the centre of the petal.
Step 8
Leave one petal hanging, then dampen the next and wrap that around the opposite side of the flower to the first petal, but not so tightly.
Step 9
Dampen all three remaining petals and stick down the left side of each petal. Then stick over the right side of each, so that the three petals will have interlinked.
Step 10
Using the middle shade of pink, prepare the next layer of petals, as in step 5. Flip them over and pull the cocktail stick through the centre. Dampen petals, and stick them evenly around the flower. Repeat the previous step using the palest flowerpaste, placing the petals alternately to the previous layer. Leave the flowers to dry overnight. Soften some sugarpaste with water to give a piping consistency and fill the piping bag. Cut off the end of the bag to give a small hole. Pipe a little of the icing onto each rose and stick in place on your cake.
Read more at http://www.goodtoknow.co.uk/recipes/537960/how-...


kvietok
http://cakejournal.com/tutorials/how-to-make-a-...
How to make a five petal fantasy flower
In this tutorial I want to show you how to make a five petal fantasy flower. The flower is inspired by a pink flower broche that I have. You are welcome to change the color for the flower, so that it match your color scheme.
Remember that the flower stamens are inedible, so you need to remove the flower before cutting the cake.
This is what I use:
Drinking glass
Foil
Foam pad
Ball tool
Rolling pin
Cornstarch
Five petal cutters in following sizes: 35mm, 80mm, 110mm
(Easy rose cutters 80mm + 110mm from JEM) (35mm/1 1/4″ any five petal cutter can be used)
Gum paste
Pink food gel color (optional)
Pearl & pink luster dust (optional)
15-20 white flower stamens (small round headed)
White non-parelis
Tylo glue
Small firm brush for the tylo glue
Small soft brush for the luster dust
Pair of tweezers
pair of scissors
Small pieces of foam
Paper towel
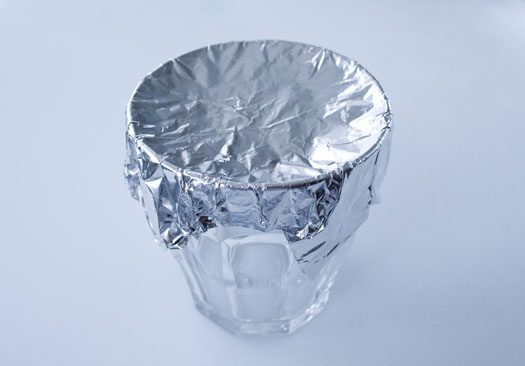
Flower former:
Start by covering the glass with double layers of foil, like shown on the photo. Dust it with a little cornstarch, so that the flower wont stick to the foil.
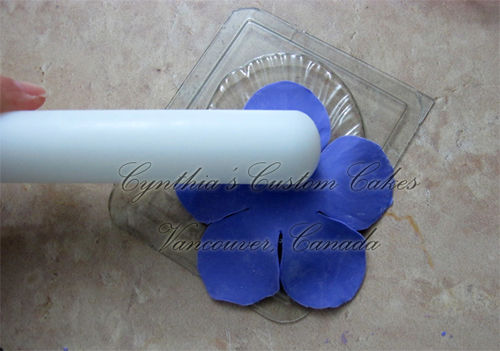
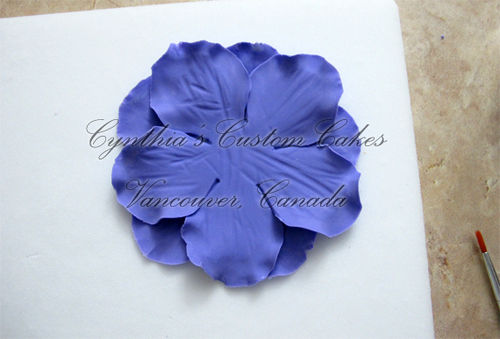
Step 1:
Color some of the gum paste pink with the food gel color and roll out the gum paste thinly. Cut out the first layer of the flower, using the large five petal cutter (110mm). Place the flower on the foam pad and thin the edges of the flower with the ball tool. Dust the tin foil with a littel cornstarch before placing the large flower on the tin foil “cup”. Shape the petals with your fingers and place small pieces of foam to keep them in place.
Step 2:
Take some white gum paste, again roll it out thinly and this time use the medium five petal cutter (80mm). Cut out the second layer for the flower, and place it on the foam pad. Thin the edges of the flower with the ball tool. Place the cut out flower on a piece of paper towel and brush the white flower, with white luster dust.
Step 3:
Brush a thin layer of tylo glue in the middle of the pink flower.
Step 4:
Place the white flower on top of the pink flower. Again shape the petals with your fingers and place small pieces of foam, to keep the petals in place while drying.
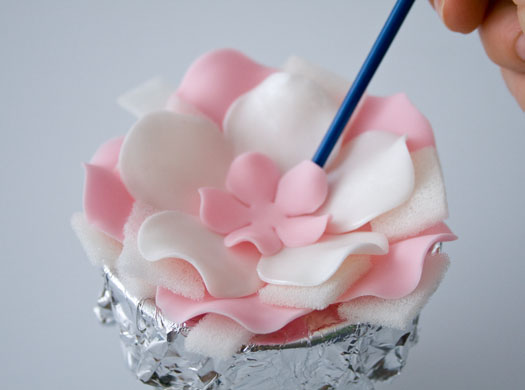
Step 5:
Roll out some pink gum paste thinly, and cut out the last petal for the fantasy flower with the small petal cutter (35mm). Thin the edges with the ball tool and glue it in the middle of the white flower with tylo glue. You can use the end of a paint brush to lift up the small petals. I dont use any foam pieces to keep the small petals in place here.
Step 6:
Take some white gum paste, make a small ball, that match the center of the flower and flatten it slightly. Brush the top of the ball with tylo glue and dip it into the white non-parelis. Secure the ball with tylo glue in the middle of the pink flower. Let the flower dry for 1 hour before you continue.
Step 7:
Take some small round headed white flower stamens and cut them a little shorter. Push in the flower stamens all the way around the edge of center with a pair of tweezers. Finish the flower by adding a little pink luster dust in the the center. Let the flower dry until firm, about 1-3 days. Remember to remove the small pieces of foam, when the flower is dry.
Tip!
You can also make smaller or larger flowers by using various sizes of five petal cutters, than the ones used for this tutorial.


ako na stromy
http://kreativnavazka.blog.cz/1212/stromcek-z-m...
http://fotky.dortydorticky.cz/fotopostupy/index...
http://www.tortysnov.sk/fotopostup/jednoduchy-s...
http://forum.dortomanie.cz/viewtopic.php?f=164&...
http://www.kuharka.ru/talk/deco/mk/6582.html?p=8
http://forum.dortomanie.cz/viewtopic.php?f=164&...
fotopostup na auto
http://blog.naver.com/PostThumbnailView.nhn?blo...
fotopostup na hezké květy - inspirace dortu http://www.portaldeartesanato.com.br/materias/1...
postup na pohovku
fotopostup na cililing